
How to Adjust UPVC Door Hinges
uPVC door frames are made to last for a long period of time, but they will need some adjustments and maintenance as they age. This is an easy task that can be completed with the use of a few basic tools.
The first thing you need to do is identify the type of hinges on your door. A flag hinge lets you to adjust it vertically and laterally, whereas the T or butt hinge can only be adjusted laterally.
Identifying the Hinges
Hinges are vital for connecting windows and doors to their frames, but they may have issues. Most of these problems are easily solved by adjusting the hinges. First, you must identify the kind of hinges that are on your window or door. This is important because it allows you to know the best way to adjust the hinges based on its style.
UPVC hinges are available in various styles, and each one comes with its own advantages and drawbacks. The kind of hinge you need will depend on the requirements of your door or frame and its design. Additionally, the type of hinge you use also determines how easy it is to open and close your window or door. Here are the major types of uPVC hinges:
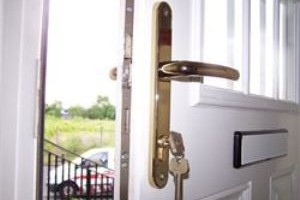
Flag hinges feature flat hinge leaves with holes through them where screws can be fixed, as well as an elongated hinge pin fitted through these knuckles. These hinges are usually used on uPVC door frames and can be adjusted both laterally and vertically.
The recessed portion of eurogroove or rebated hinges fits snugly into the door frame. This allows them to blend in with the frame for a more seamless look. They are the most popular kind of hinge for uPVC doors and are easily adjusted in all three dimensions.
The hinges feature a ball bearing in the center that guarantees smooth operation. They can be adjusted laterally and vertically. They feature ball bearings in the middle that ensures smooth operation. They can be adjusted lateraly and vertically.
Spring butt hinges made for uPVC are also a good choice because they can be adjusted to fit all three dimensions. They also come with springs that guarantee a smooth opening and closure. This type of hinge can endure a lot of pressure and is extremely durable.
When installing a new set of UPVC hinges it is crucial to adhere to all safety precautions. Wearing protective gear, using correct drill attachments and handling tools correctly are all essential to this. By following these guidelines, you can avoid any injuries that could occur during the installation process.
Identifying the Problem
There are many reasons why your uPVC door may not be closing properly. The hinges may be misaligned, warped or a problem may arise with the locking mechanism. It is crucial to take action quickly if you want to avoid draughts or leaks. If you don't get your act together the damage could get worse and your door may become difficult to open or close.
The most frequent reason for a uPVC not closing is a wrongly adjusted hinges. This can be a problem, but it's relatively easy to solve. The first step is to identify the issue, then determining what's causing the issue.
You can begin tackling the problem once you've identified it. There are two kinds of uPVC uPVC hinges - flag hinges and butt uPVC hinges. A flag hinge is comprised of two components. One is attached to the door sash while the other one is fixed onto the frame of the door or another structure. The hinge parts are attached via a rod, pin or any other axis. The sash and the hinges are visible from the inside of the door however, when closed the hinges are hidden to give the appearance of a clean and smooth internally.
A butt hinge is similar to a flag hinge, but is positioned on the back side of the sash. It also doesn't extend to the same extent as the hinge for the flag. The butt hinge is also hidden when the door is closed to give it a sleek, streamlined look.
To adjust the hinge of a butt, locate the adjuster hole and employ an allen key to turn it clockwise or counterclockwise until you achieve the desired position. You should not over-adjust a hinge because it can make the door difficult to open or close.
The most frequent issue is that the lock will not lift up to allow the door be locked. This can be due to a problem with either the handle or euro lock, however it is more likely caused by worn or misaligned hinges. This is generally an easy solve, but it's better to let a professional do it to ensure that the job is done correctly.
Finding the solution
Because of their constant use and being shut and opened It's common for uPVC windows and doors to become loose in their hinges. This can cause them to become draughty and difficult to open. It's easy to make minor changes to keep them functioning in a proper manner.
The first step is to identify the kind of hinges that you will find on your uPVC doors. There are upvc door hinge repair near me of hinges; Butt hinges (sometimes called the cylinder or pencil hinge), rebate hinges and flag hinges. A good way to do this is to look at the hinges from the outside of the door. You will probably observe that the bottom and top edges of the door have gaps. This is where the hinges are placed. There are also screw slots on the hinge plate. You can alter the height (up and down) of the hinge using these slots.
A butt hinge is made up of two parts: one that is attached to the frame and the other connected to the profile of a door sash. They are joined to each other by a rod or pin that acts as the hinge's axis. The hinges of the flag are hidden behind the door and between the frame and door when the door is closed, giving an attractive appearance.
A flag hinge is a different kind of uPVC hinge that is similar to the wooden hinges on doors. They are located on the outside edge of the door and are more appealing in appearance than the butt-hinges. They can also be adjusted both horizontally and laterally.
Lastly lastly, rebate uPVC doors are not as common today. The rebate uPVC is similar to the hinges that are flags, but it can be repositioned laterally and in compression.
Before making any adjustments it's important to check that your door is level. To check this, place a level across the top of your door and check for any gaps between it and the frame. If you notice an opening in the middle or at the top or the bottom of your door this indicates that it is not in the proper alignment.
Performing the Adjustment
In the course of time, due to constant use, over time, a uPVC door can loosen in the hinges. This can cause it to drop or even be unbalanced within the frame. Fortunately, this can be corrected with simple steps. To begin, grab a measuring tape and measure the gap between the door and the frame at the top, middle and the bottom. If the gaps differ, it means that the hinges require adjustment.
To make the adjustment, first determine what type of hinges you have installed on your uPVC door. There are three kinds of hinges which include T hinges (flag hinges) and rebate hinges (rebate hinges) and flag hinges. Depending on the hinge type there are a few different methods for making the adjustments. Flag hinges are rectangular and appear like the shape of a small flag. They are often used on modern uPVC door frames. These offer the most control in changing the position of the width of a uPVC door which allows you to move them laterally (side-to-side), vertically, and close them closer to the door jamb also known as compression. T hinges function similarly to flag hinges, however the part that is attached to the door is in the middle of the hinge. They can be adjusted laterally and vertically, but not as tightly as rebate or flag hinges.
Then take the Allen key to loosen the screw, or grub screws that control each hinge. For a vertical adjustment, you might have to loosen both the top and bottom screws. For lateral side to side adjustments, you might only require the screw on the door side of the hinge.
Check your uPVC to see whether it is aligned correctly in the frame. If not, you'll need to tweak the hinges further or even replace them completely.
Be aware that if you've seen your door not properly aligned over the course of time, this could indicate that the hinges need to be replaced. Fortunately it's a straightforward process and is usually covered by your installer's warranty or guarantee.